Animated Strikethrough Label in iOS
Bring text to life in UILabel by animating strikethrough in your iOS app. Follow this beginner-friendly, step-by-step Swift tutorial now!

Introduction
In modern app development, adding subtle animations can make your applications feel more dynamic and responsive, greatly improving user experience. One such animation is an animated strikethrough over text, which can be used to indicate completed tasks in a to-do list, discounts in shopping apps, or any situation where you want to signify that an item is no longer active.
In this step-by-step guide, we will create a custom UILabel subclass that draws and animates strikethrough lines over its text. We’ll start from scratch, explaining each part thoroughly, so even if you’re a beginner, you’ll be able to follow along and understand the logic behind each step.
Understanding the Basics
Before diving into the code, let’s understand the core concepts we’ll be using:
- Subclassing UILabel: We’ll create a subclass of
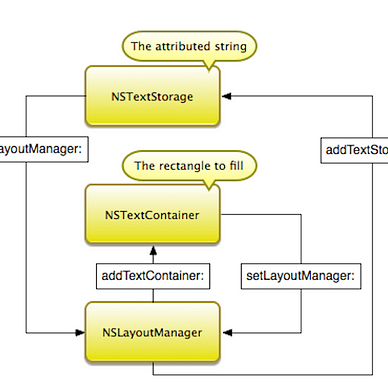
UILabelto add our custom strikethrough functionality without affecting other labels. - Text Kit: A powerful set of classes for handling text layout in iOS. We’ll use components like
NSTextStorage,NSLayoutManager, andNSTextContainerto calculate the positions of text lines. - CAShapeLayer: A Core Animation class that draws itself using vector-based shapes defined by a
CGPath. It’s perfect for drawing lines and shapes that we can animate. - Core Animation: We’ll use Core Animation to animate the drawing of strikethrough lines by manipulating layer properties.
Step 1: Creating the Custom Label Class
First, we’ll create a new class that inherits from UILabel. This will be our custom label with added functionality to draw animated strikethrough lines.
Create a new Swift file named StrikethroughLabel.swift and add the following code:
import UIKit

class StrikethroughLabel: UILabel {

    // We'll keep an array to store references to the strikethrough layers.
    private var strikethroughLayers: [CAShapeLayer] = []
}
In this step, we’re defining a new class StrikethroughLabel that inherits from UILabel.
We’ve declared a private property strikethroughLayers, which is an array of CAShapeLayer. We will use this array to keep track of all the strikethrough layers we add to the label. This is important because when the label’s text changes or when we need to redraw the strikethrough, we’ll need to remove the old layers to avoid overlapping lines and manage memory efficiently.
By creating a custom subclass, we can encapsulate all the logic related to the strikethrough animation within this class, making it reusable and clean.
Step 2: Calculating Line Frames
To draw the strikethrough lines accurately over the text, we need to calculate the exact position and size of each line of text within the label. This is especially important for multi-line labels where text may wrap or adjust based on the label’s size.
Add the following method inside the StrikethroughLabel:
// Calculates the bounding boxes for each line of text.
    private func calculateLineFrames(for text: String, font: UIFont) -> [CGRect] {
        // Create an NSTextStorage object with the label's text.
        let textStorage = NSTextStorage(string: text)

        // Create an NSLayoutManager to manage the layout of the text.
        let layoutManager = NSLayoutManager()

        // Create an NSTextContainer with the size of the label's bounds.
        let textContainer = NSTextContainer(size: bounds.size)

        // Configure the text container.
        textContainer.lineFragmentPadding = 0
        textContainer.maximumNumberOfLines = numberOfLines
        textContainer.lineBreakMode = lineBreakMode

        // Add the layout manager to the text storage.
        textStorage.addLayoutManager(layoutManager)

        // Add the text container to the layout manager.
        layoutManager.addTextContainer(textContainer)

        // Set the font attribute for the entire range of text.
        textStorage.addAttribute(.font, value: font, range: NSRange(location: 0, length: textStorage.length))

        // Use the layout manager to calculate the line frames.
        return layoutManager.calculateLineFrames(with: font)
    }
Also, add the following extension to NSLayoutManager:
extension NSLayoutManager {
    // Returns an array of CGRects, each representing a line's bounding box.
    func calculateLineFrames(with font: UIFont) -> [CGRect] {
        var lineFrames: [CGRect] = []
        var index = 0

        // Loop through all glyphs (characters) in the text.
        while index < numberOfGlyphs {
            var lineRange = NSRange()
            // Get the rectangle for the line fragment containing the glyph at the specified index.
            let lineRect = lineFragmentRect(forGlyphAt: index, effectiveRange: &lineRange)

            // Calculate the actual text width for this line.
            let textWidth = calculateTextWidth(for: lineRange, with: font)

            // Adjust the lineRect to only cover the text width, not the full line width.
            let adjustedRect = CGRect(
                x: lineRect.origin.x,
                y: lineRect.origin.y,
                width: textWidth,
                height: lineRect.height
            )

            // Add the adjusted rectangle to the array of line frames.
            lineFrames.append(adjustedRect)
            // Move to the next line.
            index = NSMaxRange(lineRange)
        }

        return lineFrames
    }

    // Calculates the width of the text for a specific line.
    private func calculateTextWidth(for lineRange: NSRange, with font: UIFont) -> CGFloat {
        guard let textStorage = textStorage, let textContainer = textContainers.first else { return 0 }

        // Get the glyph range for the given character range.
        let glyphRange = glyphRange(forCharacterRange: lineRange, actualCharacterRange: nil)

        // Get the bounding rectangle for the glyph range.
        let boundingRect = boundingRect(forGlyphRange: glyphRange, in: textContainer)

        return boundingRect.width
    }
}
In this step, we’re calculating the frames (positions and sizes) of each line of text within our label. This is crucial because we need to know exactly where to draw the strikethrough lines.
First, in calculateLineFrames(for:font:), we create instances of NSTextStorage, NSLayoutManager, and NSTextContainer. These are classes provided by the Text Kit framework, which is designed to handle text layout in a highly customizable way.
NSTextStorageholds the text and any attributes (like font).NSLayoutManageris responsible for laying out the text glyphs in the text container.NSTextContainerdefines the area where text is laid out (in this case, the label’s bounds).

We connect these components together by adding the layout manager to the text storage and the text container to the layout manager. Then, we set the font attribute for the text so that the layout manager knows how to size the glyphs.
Next, we call layoutManager.calculateLineFrames(with:) to get the frames for each line.
In the NSLayoutManager extension, we implement calculateLineFrames(with:). This method loops through all glyphs in the text, identifying the range and rectangle for each line fragment (a line of text).
For each line, we calculate the actual width of the text using calculateTextWidth(for:with:) because the line fragment rect might span the full width of the label, including padding or empty space. We adjust the rectangle to match the exact width of the text on that line and add it to our array.
By the end of this step, we have an array of CGRect values, each representing the precise position and size of a line of text within the label. This information is essential for drawing the strikethrough lines in the correct locations.
Step 3: Creating the Strikethrough Layer
Now that we know where each line of text is, we’ll create a CAShapeLayer for the strikethrough line that matches the width and position of each line of text.
Add the following method to the StrikethroughLabel:
// Creates a strikethrough layer for a given rectangle (line of text).
func createStrikethroughLayer(for rect: CGRect, lineWidth: CGFloat) -> CAShapeLayer {
  // 1. Create a bezier path for the line.
  let path = UIBezierPath()

  // 2. Start the line at the left edge of the text line.
  path.move(to: CGPoint(x: rect.minX, y: rect.midY))

  // 3. Draw the line to the right edge of the text line.
  path.addLine(to: CGPoint(x: rect.maxX, y: rect.midY))

  // 4. Create a shape layer.
  let layer = CAShapeLayer()

  // 5. Set the path of the layer to the line we just created.
  layer.path = path.cgPath

  // 6. Set the stroke color to match the label's text color.
  layer.strokeColor = textColor?.cgColor ?? UIColor.black.cgColor

  // 7. Set the line width.
  layer.lineWidth = lineWidth

  return layer
}
Here, we’re creating a function that generates a CAShapeLayer representing a strikethrough line over a single line of text.
We start by creating a UIBezierPath that represents the line we want to draw. The line starts at the left edge (rect.minX) of the line of text and ends at the right edge (rect.maxX). The y coordinate is set to the vertical center (rect.midY) of the line of text so that the strikethrough appears across the middle.
Next, we create a CAShapeLayer and set its path to the UIBezierPath we just created.
We set the strokeColor of the layer to match the text color of the label. If the textColor is not set, we default to black.
We set the lineWidth of the stroke to the value passed into the function.
Step 4: Animating the Strikethrough Layer
To create the visual effect of the strikethrough line drawing itself across the text, we’ll animate the strokeEnd property of our CAShapeLayer from 0 to 1.
Add the following method to the StrikethroughLabel:
// Adds an animation to the layer to draw the strikethrough line.
private func addStrokeAnimation(to layer: CAShapeLayer, duration: TimeInterval) {
  // 1. Create a basic animation for the 'strokeEnd' property.
  let animation = CABasicAnimation(keyPath: "strokeEnd")

  // 2. Animate from 0 (no line drawn) to 1 (full line drawn).
  animation.fromValue = 0
  animation.toValue = 1

  // 3. Set the animation duration.
  animation.duration = duration

  // 4. Set timing function for smooth animation.
  animation.timingFunction = CAMediaTimingFunction(name: .easeInEaseOut)

  // 5. Update the layer's strokeEnd to the final value (1).
  layer.strokeEnd = 1

  // 6. Add the animation to the layer.
  layer.add(animation, forKey: "strikethroughAnimation")
}
In this step, we’re defining a function to animate our CAShapeLayer so that the strikethrough line appears to be drawn across the text smoothly.
We create a CABasicAnimation that targets the strokeEnd property of the layer. This property controls how much of the path is rendered. An strokeEnd value of 0 means none of the line is drawn, and a value of 1 means the entire line is drawn.
We set fromValue to 0 and toValue to 1 to animate the line from not being visible to being fully drawn.
We set the duration of the animation to control how long the animation takes.
We also set a timingFunction of .easeInEaseOut to make the animation start and end smoothly.
Finally, we set the layer’s strokeEnd property to 1 so that when the animation completes, the layer’s displayed value matches its model value, avoiding any mismatch between the presentation and model layers.
By adding the animation to the layer, we trigger the animation to occur.
Step 5: Animating Strikethrough Lines Sequentially
If the label contains multiple lines of text, we might want to animate each strikethrough line one after the other, rather than all at once. This gives a sequential animation effect, which can be more visually appealing.
Add the following method to the StrikethroughLabel:
// Animates strikethrough lines sequentially for each line of text.
private func animateStrikethrough(lines: [CGRect], index: Int, lineWidth: CGFloat, duration: TimeInterval) {
  // Check if we've reached the end of the lines array.
  guard index < lines.count else { return }

  let currentLine = lines[index]

  // Create the strikethrough layer for the current line.
  let strikethroughLayer = createStrikethroughLayer(for: currentLine, lineWidth: lineWidth)

  // Add the layer to the label's layer.
  layer.addSublayer(strikethroughLayer)

  // Keep a reference to the layer for potential future manipulations.
  strikethroughLayers.append(strikethroughLayer)

  // Begin a new transaction to coordinate animations.
  CATransaction.begin()

  // Set the transaction's animation duration.
  CATransaction.setAnimationDuration(duration)

  // Set the completion block to animate the next line after the current one finishes.
  CATransaction.setCompletionBlock {
    // Recursively call this method for the next line.
    self.animateStrikethrough(lines: lines, index: index + 1, lineWidth: lineWidth, duration: duration)
  }

  // Add the animation to the current strikethrough layer.
  addStrokeAnimation(to: strikethroughLayer, duration: duration)

  // Commit the transaction to start the animation.
  CATransaction.commit()
}
This function is responsible for animating each strikethrough line one after another.
We begin by checking if we’ve processed all lines. If index is beyond the count of lines, we return to stop the recursion.
We obtain the CGRect for the current line.
We create a CAShapeLayer for the current line using our createStrikethroughLayer(for:lineWidth:) method.
We add this layer to the label’s layer hierarchy so that it appears on screen.
We use CATransaction to group animations and set a completion block. This allows us to execute code after the animation for the current line finishes.
Inside the transaction, we set the animation duration to the specified duration.
In the completion block, we recursively call animateStrikethrough() for the next index, causing the next line’s animation to start after the current one completes.
Finally, we add the stroke animation to the current layer, and commit the transaction to start the animation.
The net effect is that each strikethrough line animates in sequence, one after the other.
Step 6: Starting the Strikethrough Animation
With all the pieces in place, we need a method to kick off the strikethrough animation process. This method will be the one we’ll call from outside the class to start the animation.
Add the following method to the StrikethroughLabel :
func addStrikethrough(duration: TimeInterval = 0.3) {
  // Ensure we have text and a font to work with.
  guard let text, let font else { return }

  // Remove any existing strikethrough layers to avoid overlapping lines.
  strikethroughLayers.forEach { $0.removeFromSuperlayer() }
  strikethroughLayers.removeAll()

  // Calculate the frames for each line of text.
  let lines = calculateLineFrames(for: text, font: font)

  // Determine the line width based on the font size.
  let lineWidth = font.pointSize / 12

  // Start animating the strikethrough lines from the first line.
  animateStrikethrough(lines: lines, index: 0, lineWidth: lineWidth, duration: duration)
}
This public method addStrikethrough(duration:) is the entry point for starting the strikethrough animation.
We first check that the label has text and a font. Without these, we cannot calculate line frames or draw the strikethrough.
We then remove any existing strikethrough layers from the strikethroughLayers array and from the label’s layer hierarchy. This ensures that if addStrikethrough is called multiple times, we don’t end up stacking multiple strikethrough lines over each other.
We calculate the frames for each line of text by calling calculateLineFrames(for:font:).
Finally, we start animating the strikethrough lines by calling animateStrikethrough(lines:index:lineWidth:duration:), starting from index 0 to begin with the first line.
By invoking this method, the strikethrough animation sequence begins.
Step 7: Using the Custom Label in Your App
Now that our StrikethroughLabel class is ready, let’s see how to use it in a real application.
In your view controller, you can set up the label like this:
import UIKit

class ViewController: UIViewController {
    override func viewDidLoad() {
        super.viewDidLoad()

        // Create an instance of StrikethroughLabel.
        let label = StrikethroughLabel()
        // Set the label's properties.
        label.text = "This is an example of animated strikethrough.\nHere is another line."
        label.font = UIFont.systemFont(ofSize: 24)
        label.textColor = .black
        label.numberOfLines = 0

        // Set the label's frame or use Auto Layout constraints.
        label.frame = CGRect(x: 20, y: 100, width: view.bounds.width - 40, height: 200)
        view.addSubview(label)

        // Start the strikethrough animation.
        label.addStrikethrough(duration: 0.5)
    }
}
In your UIViewController, you create an instance of StrikethroughLabel just like you would with a standard UILabel.
You set its text, font, textColor and numberOfLines properties to configure how the label appears.
You set the label’s frame. In this example, we’re giving it some padding from the edges and a fixed height. In a real app, you might use Auto Layout constraints instead to make your UI responsive.
You add the label to the view hierarchy by calling view.addSubview(label).
Finally, you call label.addStrikethrough(duration:) to start the strikethrough animation. You can adjust the duration parameter to make the animation faster or slower to match your design requirements.
Conclusion
By following this guide, you’ve learned how to create a custom UILabel subclass that animates strikethrough lines over its text. We’ve walked through each step, explaining the logic and purpose behind each piece of code. This technique leverages powerful iOS frameworks like Text Kit and Core Animation to create a seamless and visually appealing effect.
Key Takeaways:
- Custom Subclasses: Creating custom subclasses allows you to extend and encapsulate functionality in a reusable way.
- Text Kit: Understanding how to use
NSTextStorage,NSLayoutManager, andNSTextContaineris valuable for precise text layout and manipulation. - CAShapeLayer and Core Animation: Using
CAShapeLayerand animating its properties likestrokeEndenables you to create smooth, vector-based animations.
Further Learning:
- Core Animation Programming Guide: Apple’s documentation provides in-depth information on Core Animation.
- Text Programming Guide for iOS: Learn more about Text Kit and text layout with Apple’s guide.
Thank you for reading until the end. If you have any questions or feedback, feel free to leave a comment below.
If you enjoyed reading this article, please press the clap button 👏 . Your support encourages me to share more of my experiences and write more articles like this. Follow me here on medium for more updates!
Happy coding! 😊👨💻👩💻
More from Ruslan Dzhafarov