How to Add Clickable Links to UILabel in iOS
Unlock interactive text in UILabel by adding clickable links to your iOS app. Follow this beginner-friendly, step-by-step Swift tutorial now!
Introduction
If you’re developing an iOS app, you’ve probably used UILabel to display text on the screen. It’s a fundamental component in iOS development. However, UILabel doesn’t support interactive features like clickable links out of the box.
In many apps, you might want to display text that includes links users can tap on, like terms of service or links to websites. In this guide, we’ll show you how to extend UILabel to support clickable links using a simple, step-by-step approach that’s suitable for beginners.
By the end of this tutorial, you’ll know how to create a custom label that can detect and handle taps on links within the text.
What You’ll Learn
- How to create a custom subclass of
UILabel. - How to parse text to find links using regular expressions.
- How to use attributed strings to style text.
- How to detect taps on specific parts of a label.
- How to handle user interactions with your custom label using gesture recognizers.
- How to map touch locations to text characters using Text Kit components.
Prerequisites
- Basic knowledge of Swift programming.
- Familiarity with Xcode and iOS app development.
- Understanding of basic UIKit components like
UILabel.
If you’re new to any of these topics, don’t worry! We’ll explain each step in detail.
Let’s Get Started
We’ll break down the process into simple steps:
- Create a Custom UILabel Subclass
- Parse the Text to Identify Links
- Add a Tap Gesture Recognizer to Detect Taps
- Determine Which Part of the Text Was Tapped
- Use the Tappable Label in Your App
Step 1: Create a Custom UILabel Subclass
First, we’ll create a new class that inherits from UILabel. This custom class will allow us to add extra functionality to the label, like detecting when a user taps on a link.
// Step 1: Create a Custom UILabel Subclass

import UIKit

class TappableLinkLabel: UILabel {
    // Will add properties and methods in subsequent steps
}
Step 2: Parse Text to Identify Links
Now, we need to figure out how to find links in the text we want to display. We’ll use a simple formatting style similar to Markdown. In Markdown, links are written like this: [Link Text](https://example.com).
We’ll write code that can find these patterns within a string and extract the link text and URL.
Understanding Regular Expressions
A regular expression (regex) is a sequence of characters that define a search pattern. They’re commonly used for string matching and manipulation.
In our case, we’ll use a regex to find all patterns in the string that match the Markdown link format.
Here’s the regex pattern we’ll use:
let linkPattern = "\\[([^\\]]+)\\]\\(([^\\)]+)\\)"Breaking Down the Regex Pattern
Let’s break down what each part of the pattern does:
\\[: Matches the[character. We use double backslashes because backslashes are escape characters in Swift strings and regex patterns.([^\\]]+): Captures any characters that are not]. The^inside square brackets means “not”, so[^\\]]matches any character except]. The+means one or more occurrences. This captures the link text.\\]: Matches the]character.\\(: Matches the(character.([^\\)]+): Captures any characters that are not). Similarly, this captures the URL.\\): Matches the)character.
Parsing the Text
We’ll write a method that:
- Uses the regex to find all links in the text.
- Extracts the link text and URL.
- Builds an attributed string to style the link text differently.
- Keeps track of where the links are in the text.
Using this regular expression, we can efficiently detect links formatted in Markdown, extract both the link text and the URL, and then convert them into tappable links.
We process the detected links by storing their ranges and corresponding URLs in a dictionary, linkRanges, which maps each detected link's text range to its respective URL. This will allow us to later identify which link was tapped.
In addition, we convert the input string into an attributed string that displays only the link text without showing the URL itself.
What are Attributed Strings?
An NSAttributedString is a string that has attributes (like font, color, underline) applied to ranges of characters within it. This allows us to style parts of the text differently.
Adding the Method to Our Class
Add the following code to your TappableLinkLabel class:
private var linkRanges: [NSRange: URL] = [:]

func setMarkdownText(_ markdownText: String, linkColor: UIColor = .blue) {

    // 1. Create a mutable attributed string to build the final result
    let attributedString = NSMutableAttributedString()

    // 2. Regular expression pattern to detect Markdown-style links in the format: [Link Text](URL)
    let linkPattern = "\\[([\\w\\s\\d]+)\\]\\((https?:\\/\\/[\\w\\d./?=#]+)\\)"

    // 3. Compile the regular expression with the pattern
    let regex = try? NSRegularExpression(pattern: linkPattern, options: [])

    // 4. Define the full range of the input string
    let range = NSRange(location: 0, length: markdownText.utf16.count)

    var lastLocation = 0

    // 5. Use the regular expression to match link patterns in the input text
    regex?.enumerateMatches(in: markdownText, options: [], range: range) { result, _, _ in
        guard let result else { return }

        // Append non-link plain text before the link

        // 6. Get the range of plain text between the last processed location and the current match
        let plainTextRange = NSRange(location: lastLocation, length: result.range.location - lastLocation)

        // 7. Extract the plain text that appears before the link (non-link text)
        let plainText = (markdownText as NSString).substring(with: plainTextRange)

        // 8. Append the plain text to the attributed string
        attributedString.append(NSAttributedString(string: plainText))

        // Append link text with attributes and store the link URL

        // 9. Extract the range of the link text (text inside square brackets)
        let linkTextRange = result.range(at: 1)

        // 10. Get the actual link text from the input string (e.g., 'Link Text' from [Link Text])
        let linkText = (markdownText as NSString).substring(with: linkTextRange)

        // 11. Extract the range of the URL (text inside parentheses)
        let linkURLRange = result.range(at: 2)

        // 12. Get the actual URL string from the input string (e.g., 'https://example.com' from (https://example.com))
        let linkURLString = (markdownText as NSString).substring(with: linkURLRange)

        // 13. Define the attributes for the link text (font, color, underline)
        let linkAttributes: [NSAttributedString.Key: Any] = [
            .font: font,
            .foregroundColor: linkColor,
            .underlineStyle: NSUnderlineStyle.single.rawValue,
            .underlineColor: linkColor.withAlphaComponent(0.5)
        ]

        // 14. Create an attributed string for the link text with the defined attributes
        let linkAttributedString = NSAttributedString(string: linkText, attributes: linkAttributes)

        // 15. Append the styled link text to the attributed string
        attributedString.append(linkAttributedString)

        // Store the link range and URL

        // 16. Calculate the range of the appended link text in the attributed string
        let linkRange = NSRange(location: attributedString.length - linkText.count, length: linkText.count)

        // 17. Store the range and corresponding URL in the linkRanges dictionary
        linkRanges[linkRange] = URL(string: linkURLString)

        // 18. Update the lastLocation to the end of the current match (the position after the link)
        lastLocation = result.range.location + result.range.length
    }

    // If there is any plain text left after the last match, append it to the attributed string
    if lastLocation < markdownText.count {
        // 19. Define the range of the remaining plain text
        let plainTextRange = NSRange(location: lastLocation, length: markdownText.count - lastLocation)

        // 20. Extract the remaining plain text from the input string
        let plainText = (markdownText as NSString).substring(with: plainTextRange)

        // 21. Append the remaining plain text to the attributed string
        attributedString.append(NSAttributedString(string: plainText))
    }

    // Set the resulting attributed string (with styled links and plain text) to the attributedText property
    attributedText = attributedString
}
Step 3: Add a Tap Gesture to Detect Taps
By default, UILabel doesn’t respond to user interactions because isUserInteractionEnabled is false.
To make our label respond to touches, we’ll:
- Enable user interactions on the label.
- Add a tap gesture recognizer to detect taps.
What is a Gesture Recognizer?
A gesture recognizer is an object that you attach to a view that allows it to respond to touches (gestures) like taps, swipes, pinches, etc.
Adding the Gesture Recognizer
Update your class as follows:
import UIKit

class TappableLinkLabel: UILabel {

    // Closure that will handle link taps and pass the URL
    var linkTapHandler: ((URL) -> Void)?

    override init(frame: CGRect) {
        super.init(frame: frame)
        setupGestureRecognizer()
    }

    required init?(coder: NSCoder) {
        super.init(coder: coder)
        setupGestureRecognizer()
    }

    // Setup the gesture recognizer
    private func setupGestureRecognizer() {
        // Set isUserInteractionEnabled to `true` to allow the label to respond to touch events
        isUserInteractionEnabled = true

        // Initialize a tap gesture recognizer and add it to the label
        let tapGesture = UITapGestureRecognizer(target: self, action: #selector(handleTap(_:)))
        addGestureRecognizer(tapGesture)
    }

    // This method is called when the user taps the label.
    // It gets the tap location and determines if it corresponds to a link.
    @objc private func handleTap(_ sender: UITapGestureRecognizer) {
        let location = sender.location(in: self)

        guard let index = characterIndexAtPoint(location) else {
          return
        }

        // Check if the tapped location corresponds to a link
        for (range, url) in linkRanges {

          if NSLocationInRange(index, range) {
            // The user tapped on a link
            linkTapHandler?(url)
            return
          }
        }
    }

    // Include the setMarkdownText method from before
}
In this step, the tap gesture detects where the user taps within the label and compares the tap location to the stored linkRanges to check if the user tapped a link.
Step 4: Determine Which Part of the Text Was Tapped
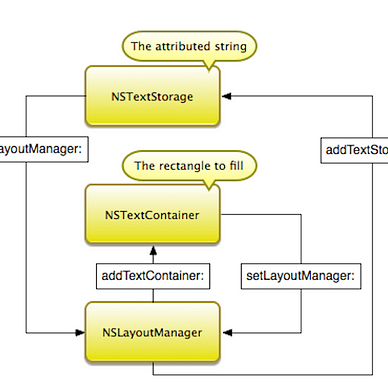
Now, we need to figure out exactly which character the user tapped on, so we can see if they tapped on a link. To determine which part of the text the user tapped, you need to calculate the exact character index using layout manager.
Using Text Kit Components
Text Kit is a powerful set of classes provided by UIKit for text layout and rendering.
We’ll use:
NSLayoutManager: Manages the layout of text in a text container.NSTextStorage: Stores the styled text (our attributed string).NSTextContainer: Defines the area where text is laid out.
By using these components, we can accurately calculate which character was tapped based on the user’s touch location in the label.
Adding the Method to Calculate the Tapped Character Index
Add this method to your class:
func characterIndex(at point: CGPoint) -> Int? {
    guard let attributedText,
          !attributedText.string.isEmpty else {
        return nil
    }

    // Create an instance of NSTextStorage with our attributed text
    let textStorage = NSTextStorage(attributedString: attributedText)

    // Create an instance of NSTextContainer with the label's size
    let textContainer = NSTextContainer(size: bounds.size)
    textContainer.lineFragmentPadding = 0
    textContainer.maximumNumberOfLines = numberOfLines
    textContainer.lineBreakMode = lineBreakMode

    // Create an instance of NSLayoutManager and associate it with the textStorage and textContainer
    let layoutManager = NSLayoutManager()
    layoutManager.addTextContainer(textContainer)
    textStorage.addLayoutManager(layoutManager)

    // Get the character index at the tap location
    let index = layoutManager.characterIndex(for: point, in: textContainer, fractionOfDistanceBetweenInsertionPoints: nil)

    return index
}
Explanation
- NSTextStorage: Holds our attributed string and provides it to the layout manager.
- NSTextContainer: Defines the area where text is displayed. We set its size to match the label’s bounds.
- NSLayoutManager: Lays out the text and calculates where each character is displayed.
- Calculating Character Index: We use the layout manager to find out which character corresponds to the touch point.
Step 5: Use the Tappable Label in Your App
Now that our TappableLinkLabel is ready, let’s see how to use it.
In this example, we handle a single link, but setMarkdownText is fully capable of handling multiple links. Simply pass a string with several markdown-style links, and the function will process each one.
Here’s an example of how to set it up:
Setting Up the Label in a View Controller
import UIKit

class ViewController: UIViewController {
    override func viewDidLoad() {
        super.viewDidLoad()

        let tappableLabel = TappableLinkLabel()

        // Handle link taps
        tappableLabel.linkTapHandler = { url in
           print("Tapped on URL: \(url)")
           // Open the URL in Safari
           UIApplication.shared.open(url)
        }

        tappableLabel.setMarkdownText("[Visit Apple](https://www.apple.com)")

        view.addSubview(tappableLabel)
    }
}
In this example, we handle a single link, but you can easily expand this to support multiple links by adjusting the link parsing logic to handle more cases.
Conclusion
Congratulations! You’ve successfully created a custom label that can parse Markdown-style links and respond to user taps.
This guide covered:
- Creating a subclass of
UILabel. - Using regular expressions to parse text.
- Styling text with attributed strings.
- Using gesture recognizers to detect touches.
- Mapping touch locations to text characters.
With this approach, you’ve transformed UILabel into a more interactive element. You can expand this functionality by allowing different gestures, applying more complex link parsing, or customizing the behavior for specific link types. You can also expand on this feature by adding custom styles, such as different fonts or background colors for links. Additionally, consider handling other gestures, such as long presses, to trigger different types of interactions.
Where to Go From Here:
Now that you have the basics, here are some ideas to expand on:
- Customize Link Styles: Change the font, color, or underline style. You could even change the style when the link is pressed.
- Support Other Formats: Modify the regex to support different link formats or add support for bold and italic text.
- Handle Other Gestures: Add support for long presses or double taps to provide additional functionality.
- Improve Accessibility: Ensure that VoiceOver reads the links correctly by setting appropriate accessibility labels and traits.
- Error Handling: Add checks for invalid URLs or malformed markdown to make your code more robust.
- Animated Feedback: Provide visual feedback when a link is tapped, such as changing the background color of the link text.
Additional Resources
- Apple Developer Documentation:
- UILabel
- Gesture Recognizers - Text Kit Overview:
- Apple Text Programming Guide for iOS - Regular Expressions in Swift:
- NSRegularExpression
- Swift Regex Resources
Thank you for reading until the end. If you have any questions or feedback, feel free to leave a comment below.
If you enjoyed reading this article, please press the clap button 👏 . Your support encourages me to share more of my experiences and write more articles like this. Follow me here on medium for more updates!
Happy coding! 😊👨💻👩💻
More from Ruslan Dzhafarov
